This post may contain affiliate links.We may earn little commission or products from the companies mentioned in this post.
Today you would be learning how to create a blog from scratch. I will show you how to pick the best hosting plan with Bluehost, how to choose and get a domain name, how to install CMS script which is WordPress, how to work on a blog appearance( themes, widgets, customize and plugins), how to create pages and menus and how to write and publish a post.
Before we dive into our business for today which is how to create a blog with Bluehost. I would like us to understand some terms in creating a blog.
Some terms you should know and their meaning
Hosting: Hosting means you acquiring space on the world wide web for your blog to live in. Is like renting a store to put in your products but this time around you are doing it online. There are a lot of companies offering these services out there, however, we would be using Bluehost and I will tell you why they are the best.
Domain name: That’s the name you would want your blog to be called. Like how my domain name is Broke Girls Get Fixed.
Control Panel: For short it is called a Cpanel. That is where you do the background work of your blog. It is in your Cpanel that you would install your CMS script, create your blog email address and secure your blog. In a bit, you will be learning all of that.
CMS Script: Content management system is the software used to manage digital contents and allows you to publish directly to the web. We would be using WordPress because it is very user friendly and reliable.
I will get a little commission from Bluehost if you purchase any product but at no extra cost to you.
How to host your blog With Bluehost
We would be using Bluehost Hosting company in this tutorial. But before we start, you should know why it is important to self-host your blog. Here are two solid reasons:
1. It gives you full control over your blog. I mean you could wake up and sell it tomorrow and no one will ask you why. But you can’t do that with a free host no matter how successful your blog turns out to be.
2. It allows you to monetize your blog unlimitedly. There are over 10 ways to monetize a blog. However, trust me when I say a free hosted blog might just give you access to 3. I own 2, so I know what am talking about.
Wait a sec! you need to know why Bluehost is the best out there
Reasons why Bluehost is the best out there
- Free domain for a whole year. If you sign up right now you don’t have to pay for your domain name for 12 good months.
- Free SSL certificate. It means you don’t pay for you sites security, blue host will cover the cost for you.
- 24/7 support. Up at night trying to figure somethings? Bluehost will be there for you.
- Bluehost are the best at giving discounts, like a really good discount. Even up to 60% off.
- 30 days guarantee. If you are not happy after 30 days Bluehost is happy to give you back your money. But you won’t have a reason not to be happy.
- Bluehost is powering over 2 million websites in the world. This only proves how amazing it is to keep having new and more customers. More will join Bluehost after you.
- Bluehost gives $100 for marketing credit. Both for Google ads and WordPress ads.
Hosting with Bluehost
Step 1
Click here and you would land on the page you see below

Click on get started
Step 2
Choose a plan. But before we do that let me help you in choosing the best plan that will fit your purpose.
How to choose the best hosting plan with Bluehost
Know the kind of blog you want to start. If it’s a simple blog for a personal purpose then you can go with a basic plan. But if your blog is for business or going to contain a lot of information and directory. Then go for a business or pro plan as you would need a larger space compared to a small blog.
Another thing to consider is your experience. If you are a newbie to web designing and owning a blog. I would advise you to go for a basic plan. Just so you don’t spend too much on what you are yet to understand
Don’t host for less than a year. Bluehost has a lot of benefits and the best discount percentage I know. But you only get to enjoy that with a plan of a year or more. If you can get hosting out of the way for 12 to 36 months you won’t have to worry about it on a monthly bases. However, if your budget for starting a blog can only cover monthly hosting then nothing should stop. Go ahead and pay for a one month plan.
Step 3
After selecting a plan, next is to create a domain.

If you already have a domain purchased from somewhere typing it into the ” I have a domain name” box. But if none type a new name in the box to your left.
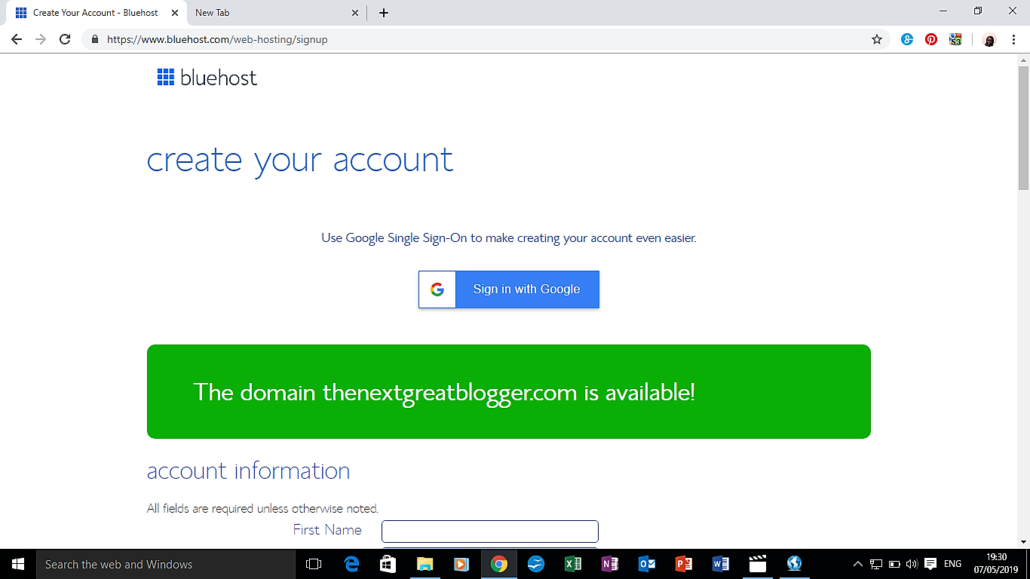
If the domain name you want is already taken you would be shown. However, if it’s not you will see this

Step 4
Create your account. Fill in every information needed
In “Package Information” You should understand that in Bluehost the more months you choose the lower the monthly price.
- 12 months= $5.95/month
- 24 months= $4.95/month
- 36 months= $3.95/month
Please don’t cancel anything in “package extra” they are extremely important.
Step 5
Click on submit after reading the information in the blue box.
Yippee! we are done with hosting. Next is getting our blog present on the internet.
Time to install our CMS script
Starting a blog is easy and with the step by step guide, I’m going to show you it just became easier. In less than an hour, you would be a proud owner of a brand new blog. Doesn’t that feel amazing?
I know right. I created this blog myself and I still do everything on this blog myself. The interesting part about it was, I had no skill in web designing. In case you are thinking this needs some skills you are wrong. No skill is needed rather an attentive and focused mind.
Step 1
Check your email, your hosting company which is Bluehost have sent you a mail. This mail contains your Control Panel login details. Don’t panic if it takes a while the mail will arrive.
Step 2
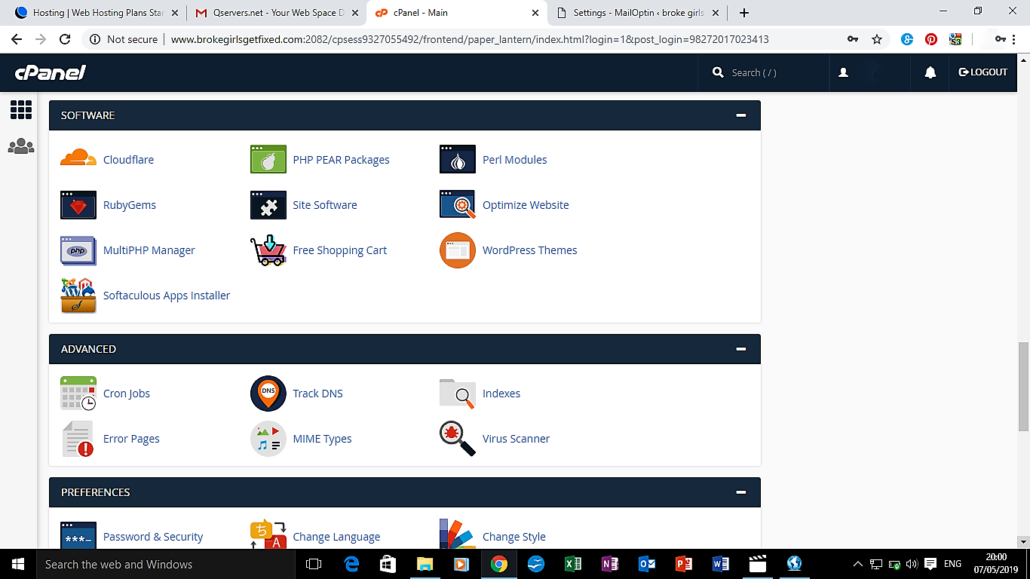
Login to your Cpanel and it takes you to the page you see below

Under SOFTWARE click “Softaculous apps installer” and it will take you to the next page

On this page, you can see WordPress staring at you on the face. It is the CMS Script we would be using.
Step 3
Click on WordPress and you would land on the installation page

Step 4
Fill in every needed information. Make sure you use a strong password. It’s a website remember and it can be hacked. Don’t forget Bluehost have covered the expenses for you.
“In Directory” under “choose domain” erase “wp” and leave the space empty before clicking install

Step 5
This is the last and final step so cross-check every info given before clicking “Install” at the bottom of the page.

Select a theme that suits the kind of blog you want to have and looks easy to customize.
Click on “install”
Yippee! Now your blog is live on the internet. What next?
The next thing you decide to do with your blog is left to you. However, I will show you how to do the major things like a blog post and page publishing and site appearance.
How to publish your first blog post
Step 1
Login to your admin area, you can find the link to it in your email from Bluehost or you can add “wp-admin” at the ending of your blog URL if having any difficulties finding it. For example http://thenextgreatblogger.com/wp-admin

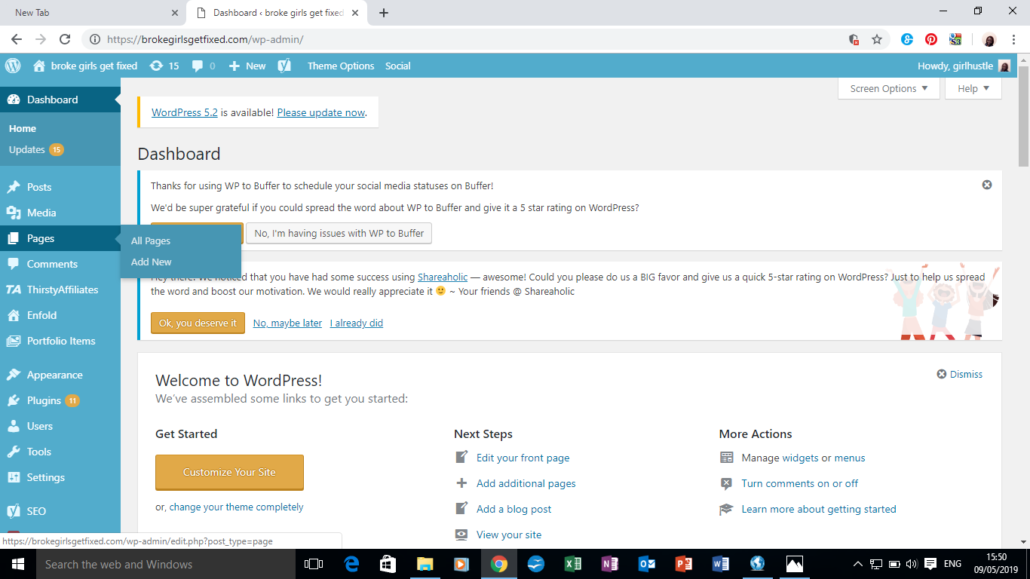
Once logged in you arrive at your dashboard. This is where the magic happens.
Step 2
Click on “pages” on the left side menu on your dashboard
Click “add new” when you are through with editing your page click “publish”
Page builders help you design your pages and you can install them as plugins. Shortly I will show you how to install plugins, it’s pretty simple.
Create relevant pages like Home(landing page), blog (blog post page), About me page, disclaimer or private policy page, contact page and resource page. Then add them to your menu.
Pages out of the way let’s write our blog post
Step 3
Click on “Post” on the menu at your left.
Click “Add New”
Type in the title of your blog post. From the settings at your right, you could add featured image, categories, tags and edit your permalink if you want to. Once done writing your content click “publish”. If you are not done, simply save your unfinished work as a draft.

Major features of a blog post
Headings and subheadings. your blog post should have them
Good Images. This will be the images you share on social media and you can create amazing ones with
SEO, Yoast SEO makes it easy and there is a plugin for it.
Internal and external links
How to find and install plugins on your blog
Plugins are very important to help you function well as a blogger. They make work easy and faster.
In your Dashboard area, find “plugins” at the left side menu and click on “add new”
If the plugin you need doesn’t appear on the page simply search for it. See the image below

Once found click “install now” then click “activate” Plugins are out of the way lets learn another thing.
How to work on your blog’s appearance
Blog appearance covers theme, menu, customize and widgets.
Customise your Theme
Under “Appearance” click “themes”. It will take you to the page with a lot of themes. Take a pick and “activate”
If you want to work on the background of your theme and styles. Such as adding a logo, favicon, fonts and colours. Got to Appearance under it click on “theme editor”.
Working on your WordPress menu
You need pages to add to your menu so if you haven’t created a page go and do it now.
Under Appearance click “menu”

Beside Menu structure, there is “Add menu items”. Select what you want to be on your menu then click “save menu” and you are done with your menu.
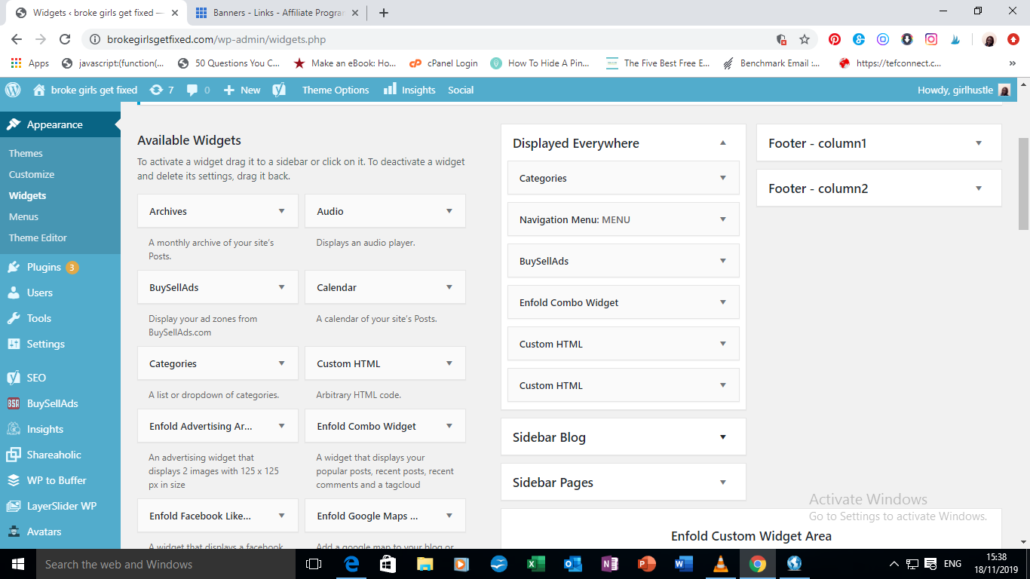
Working on your WordPress Widgets
Widgets are extra features you add to your blog to improve its functionality. You can add and remove them as it pleases you. There are social media widgets, newsletter widgets, advert widgets e.t.c.

There are over 20 widgets to choose from.
Simply find “Widgets” under appearance, select the widgets you want on your pages and where you want them to show.
How to customize your WordPress blog
“Customize” is also found under Appearance and the best way to do it is with live preview so you can see exactly what you are working on and if you love the results.
It’s easy to customize your blog and it doesn’t take long. Anytime you are not ok with a look of a page just customize it.
I have covered every basic thing you need to know when starting a blog. However, if there is anything you want to know more about drop a comment and I will be on it ASAP.
Now you have a blog, what next?
- Constantly create amazing contents
- Promote your content on every platform you can
- Learn new things to add to your knowledge
- Apply to ads network
- Join Affiliate programs and
- Make some passive income.


